
Water System, Volumetric Fog, FullScreen Effect and Cinematic Eye Shader setup in Unity
- Hugo Kostic
- 24 juil. 2022
- 10 min de lecture

Dernière mise à jour : 10 févr. 2024
For Unity 2022 beta we could test out some new features, and I want to take a look, focusing on HDRP
Some new features I am excited to test :
The new Water system for Ocean, pool and Lake
The new Volumetric Materials using ShaderGraph to create custom clouds and fog shapes
The new FullScreen ShaderGraph master node for CustomPass and Post Process
The new Adaptive Probe Volumes
The new Cinematic Eye Shader with caustics from Ennemies
And finally the new support for CustomRenderTexture within ShaderGraph, let's do some raindrop.
Getting started
To grabb the stuff, we need to start a New Project using HDRP and we need to found and activate all the options regarding Water activation into the HDRP asset.
Install the High Definition Render Pipeline from the Package Manager, with a classic configuration, the HDRP Wizard act as a PopUp tab to help to setup the HDRP in the project correctly, I did use the DXR setup for this chapter. Otherway we found it under Windows > Rendering > HDRP Wizard
I do Embed the Configuration Files and use only one HDRP Asset in the quality settings in the Project Settings, and then I use the wizard to fix all the resources for me, everything should be green as in the image below.

Water System
The new Water system is not finished yet, but the community can already use it and take a look with the Unity 2022 Beta version. Lets take a look :
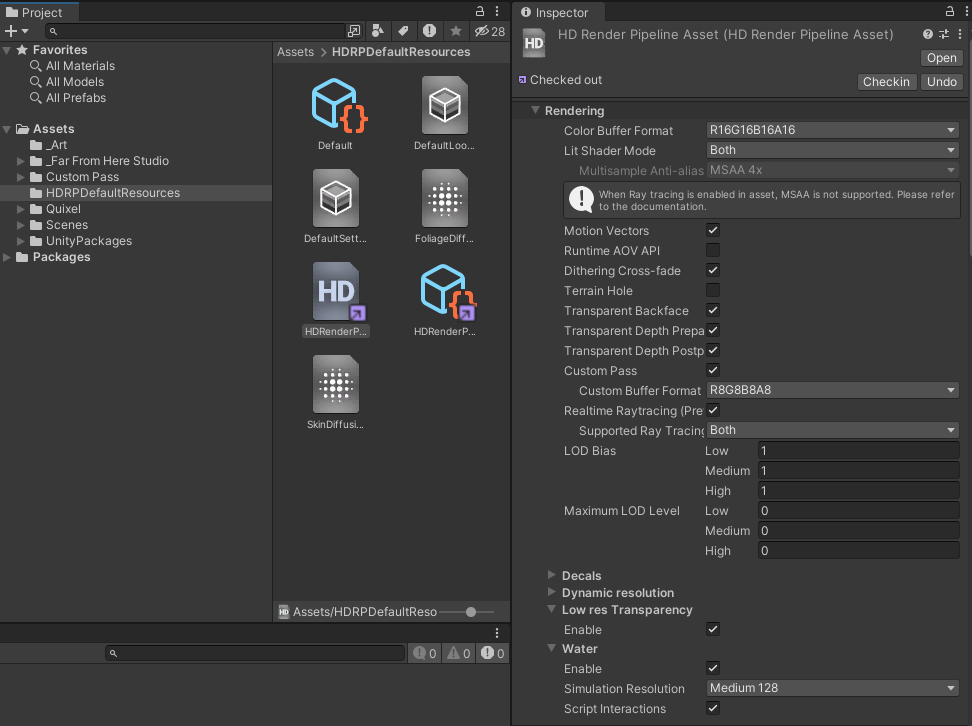
The HDRP Asset can be found in the Assets folder or from the Project Settings tab.
Open the HDRP Asset, and look for the Water label, enable the stuff.
I choosed to check Script Interaction, because I want to make an object floating on the water
In the Project Settings, we now need to get into the HDRP Global Settings under Graphics Settings. Let's add Water Rendering in the Default Volume Profile, and enable it as in the left image below.


After that, scroll down and go into Frame Settings, deploy Camera > Rendering and check Water, just as in the right image.
Once we have setup this option we are good to go, and then I can create an Ocean Objects using the GameObject > Water Surface > Ocean Sea or Lake into our scene.
Here I have a Presets file to apply settings to get this Ocean : Drive Link.
Here is the Sky & Fog Volume that apply the Cloud.
Before using it, make sure enable Clouds in the HDRP Asset and in the HDRP global Settings I show earlyer.
Ok, now my scene is pretty but let's add a floating objects that have some "buoyancy" that go according to our Ocean, so I did take a look on the Unity Forum to found the Beta Features announcement tread, luckily a Unity dev did share a script in the tread, so here we are to Copy / Past it to our project named FitToWaterSurface.cs
using UnityEngine;
using UnityEngine.Rendering.HighDefinition;

public class FitToWaterSurface : MonoBehaviour
{

    public WaterSurface targetSurface = null;
    public int numIterations = 8;
    public float error = 0.01f;

    // Internal search params
    WaterSearchParameters searchParameters = new WaterSearchParameters();
    WaterSearchResult searchResult = new WaterSearchResult()

    // Update is called once per frame
    void Update()
    {
        if (targetSurface != null)
        {
            // Build the search parameters
            searchParameters.startPosition = searchResult.candidateLocation;

            searchParameters.targetPosition = gameObject.transform.position;

            searchParameters.error = error;

            searchParameters.maxIterations = numIterations;

            // Do the search
            if (targetSurface.FindWaterSurfaceHeight(searchParameters, out searchResult))
            {
                gameObject.transform.position = new Vector3(gameObject.transform.position.x,
		searchResult.height, gameObject.transform.position.z);
            }
        }
    }
}
Once this script added to the project, I did create a simple sphere, conserving the SphereCollider, I did added a Rigidbody and our new FittoWaterSurface script.
I am pretty happy of this floating sphere... I would likely replace the sphere with a little boat, a piece of wood or a bottle with a coded message inside :)
Volumetric Materials
Ho dear,
I was waiting this one a long time ago, the equivalent in Unreal Engine is pseudo-volume, the idea behind the Volumetric materials is to allow the user to author a Volumetric object (like a cloud) using a ShaderGraph shader.
Why do I love the idea? Because pseudo volume are already used and beloved by the Unreal Tech-folk, in Unity and until now, we had no direct way to do this stuff using the HDRP's fog. I was thinking about a workaround using a 3D CustomRenderTexture written by a Shader... Now we have the best way to do so, there is a material slot, perfect to add effect like use a sphere or gradient masking as parameters to use into a local Volumetric Fog.
Let's Verify first if we can create this type of Shader.. It appear to show under window Shader Graph > HDRP > Fog Volume Shader Graph

Lets create a Local Volumetric Fog object into the scene.. Window : GameObject > Rendering > Local Volumetric Fog
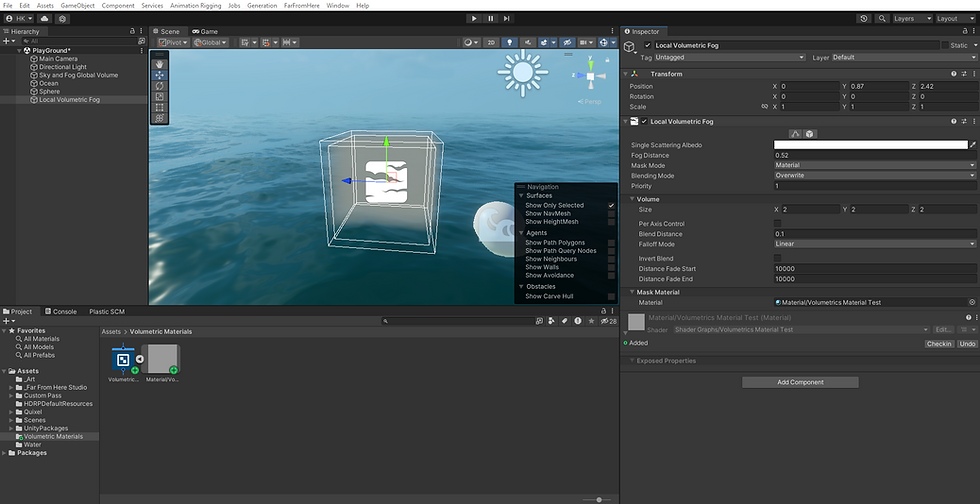
In the way to make my test I figure out that I need to be able to put a 3D Texture, as I lost the ability to use the texture slot when the local volumetric fog is set to Material instead of Texture.
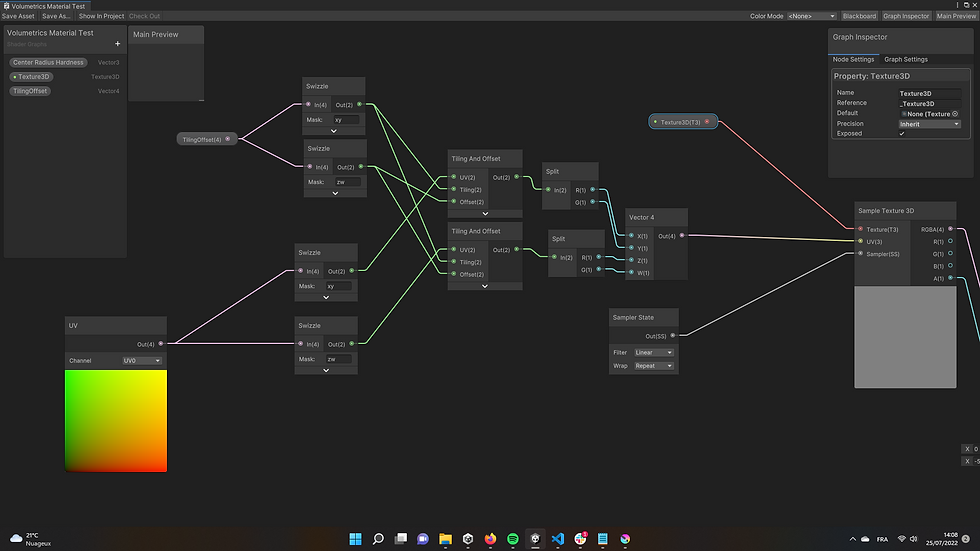
But first I need to understand how to deal with UV, because every Texture need some UVs, So let's open the Shader and test some stuff with uv..
I added a Texture3D property connected to a SampleTexture3D node, this sampler is connected to a classic UV node set as uv0

And then I decide to add a Vector4 property to control both tiling and offset of the 3D noise texture, let's add a SamplerState to specify it as tilable texture anyway
Let's check if our Local Fog Volume Object now that I have setup the shader to use a 3DTexture into this newly created property.
Here is some 3DTextures that I used to try I my project, both are random noise generation from Photoshop (1) and Krita(2 - 3) :
Column = 32 Row = 1

Column = 16 Row = 1

Column = 16 Row = 1

I change the Local Volumetric Fog Shader to use the one of them in the 3DTexture property. And now I can check the result
I don't have acces to the Tiling properties, so you may have an issue if the XY value of _TilingOffset is equal to 0 as default value in the shader, set them to one and you should see the texture as in my previous screenshot.
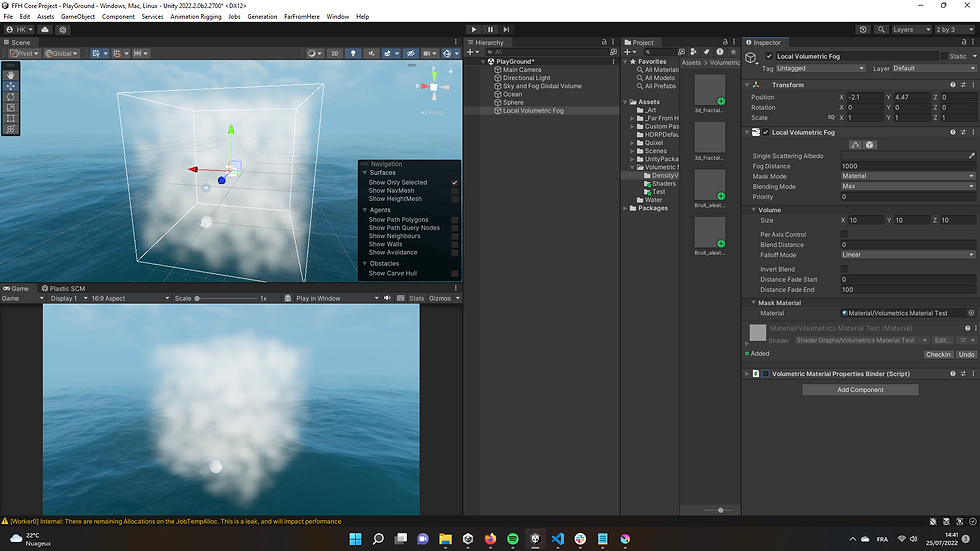
To help me at inject the needed properties into the fog volumes and to tweak it easily, I have create a tiny script that allow me to create Lists of properties, it can inject tree types of properties : Float, 3DTexture and Vector4 (almost all we need to start playing serioulsly)
Here is the VolumetricMaterialPropertiesBinder.cs script :
using System.Collections;
using System.Collections.Generic;
using UnityEngine;
using UnityEditor;


[System.Serializable]
public struct VM_FloatProperty
{
    public string PropertyName;
    public float floatValue;
}

[System.Serializable]
public struct VM_TextureProperty
{
    public string PropertyName;
    public Texture3D texture3DValue;
}

[System.Serializable]
public struct VM_VectorProperty
{
    public string PropertyName;
    public Vector4 vector4Value;
}


[ExecuteInEditMode]
public class VolumetricMaterialPropertiesBinder : MonoBehaviour
{
    public Material VolumetricMaterial;

    public VM_FloatProperty[] floatProperties;
    public VM_TextureProperty[] textureProperties;
    public VM_VectorProperty[] vectorProperties;

    void Update()
    {
        foreach (var properties in floatProperties)
        {
            VolumetricMaterial.SetFloat(properties.PropertyName, properties.floatValue);

        }
        foreach (var properties in textureProperties)
        {
            VolumetricMaterial.SetTexture(properties.PropertyName, properties.texture3DValue);

        }
        foreach (var properties in vectorProperties)
        {
            VolumetricMaterial.SetVector(properties.PropertyName, properties.vector4Value);
        }
    }
}
Adding this script to the Local fog Volume allow me to manage what properties I want to use and tweak. First, I need to slot my Volumetric Shader's Material in the VolumetricMaterial Material to get the script working.
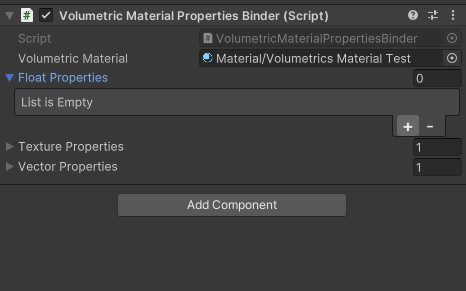
After that, I have to manage my list of properties by adding one (using the "+") in the list and his name, in the good type, as soon I create some new one with this type into the Volumetric Shader, and so I have an easy controller to tweak both my 3D noise texture, and my newly created Vector4 to handle Tiling and Offset
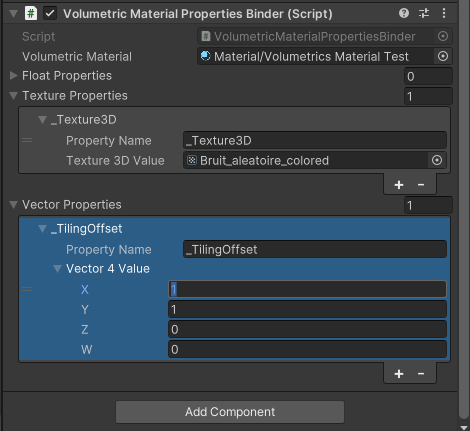
So I now have the same control over the texture using my Shader as the I had when the Local Volumetric Object was in Texture mode instead of Material mode.
Happy with the result, I now want to have a sphere shape instead of the box for my Local Fog Volume object.
To do so we will need to use a node call SphereMask into the Shader, as spheremask have some properties, I ended up adding a Vector4 property to control the Radius, the Hardness and the Center.
And to bind the Coord input of the SphereMask Node with a Position node as object position.
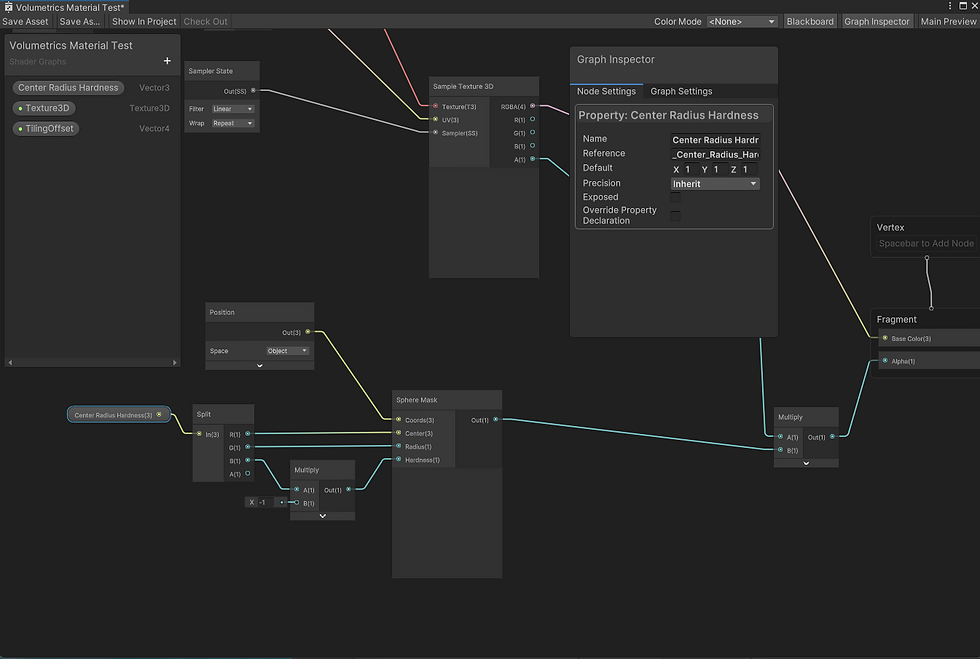
and create a new Vector with the good name in the VolumetricMaterialPropertiesBinder script list, I am now able to tweak both the size of the sphere and the falloff.
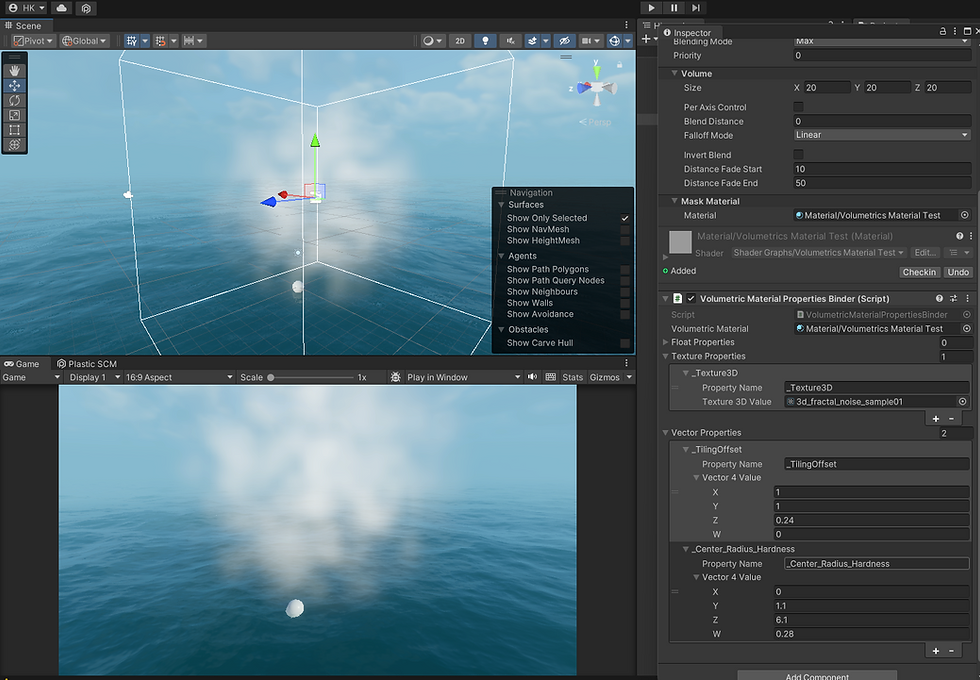
Here we are we got our custom spherical fog Volume into the scene!
This is perfect to add a better organic look to the Volumetric Fog of some area in a scene, the Noise can be used with the multiply mode.
It gave me the Idea to create some nice "VFX" with this stuff : My plan is to play with a sphererical Fog heavily noised and a Point Light casting some volumetric lighting, to create a "pulsing fog" effect inside the light rays emitted from the point light, like a spell from a Priest.
Let's try this stuff into the scene using our Local Fog Volume.
First let's get into the Scene and let's setup our Local Fog Volume to use the multiply mode, tweak a little bit the power of the noise, Addind a Point Light as a child,, same position, tweak the range of the light to be the same as the sphere, then tweak the color and the properties of the light
Here we can see the result :
No noise into the shadowed part, so it affect only the light rays area.
Ok let's prepare a new scene, I tuned the Camera to use a Color as background instead of Sky.
I tweaked the Sky and Fog volume's fog to be cast only in a close distance
Let's open the Volumetric Shader an take to look, how I can obtain a Radial Pulse into this volumetric light..
The Object Position Node sound Promising as it look to return an object centered Vector4, a little bit like UV0 but remaped from 0:1 to -1:1
If we connect directly the Object Position Node into the Color Input of the Shader MasterNode we can look how it look like :
It look really nice, like UVs, each Color describe a Vector2 coordinate, the X is red, the Y is Green and the Z is blue.
It should be ok to calculate the distance for each pixel comparing to the object origin position vector (0,0,0).
As we already have a Radius properties to control our sphereMask size, we can use it to subtract it to our Distance Node result.
As you can see I connected the result of this substraction to a Sine Node which will output a value from 0 to 1 using our Distance node calculation, which should give me the needed ripple effect
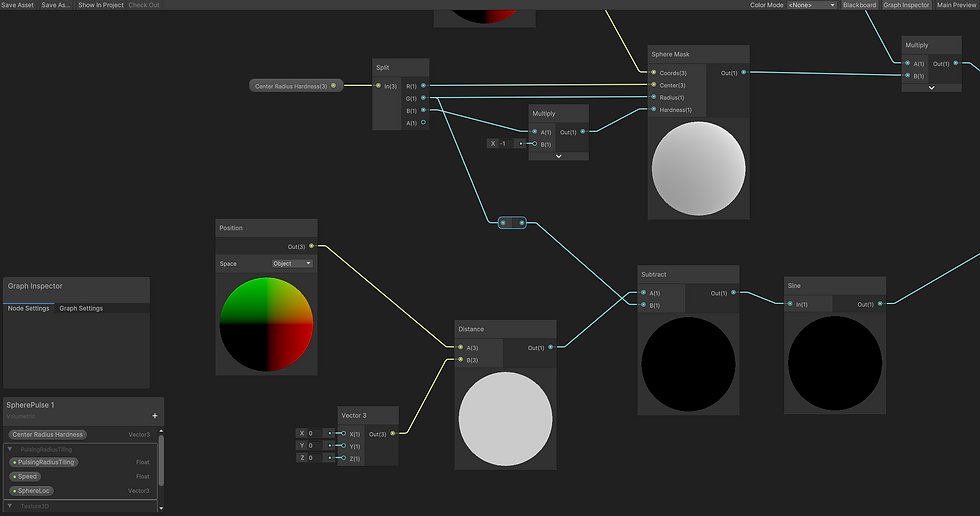
So I did multiply the result of the previously made spheremask (which was multiply with the noise) with my new ripple result, I used a saturate to make this values stay between 0 and 1 before inject the Alpha of the MasterNode
As we can see the noise texture is still responsible for the color/density of the fog, so I did added a Vector2 to control the contrast of the noise.
After that I used a Time Node to Add it to the Radius value before injecting it into the Substract Node, so i did I make the ripple moving with time.
To control the amount of Ripple I did multiply the object position Vector3 with a property Float before injecting it into the Distance Node
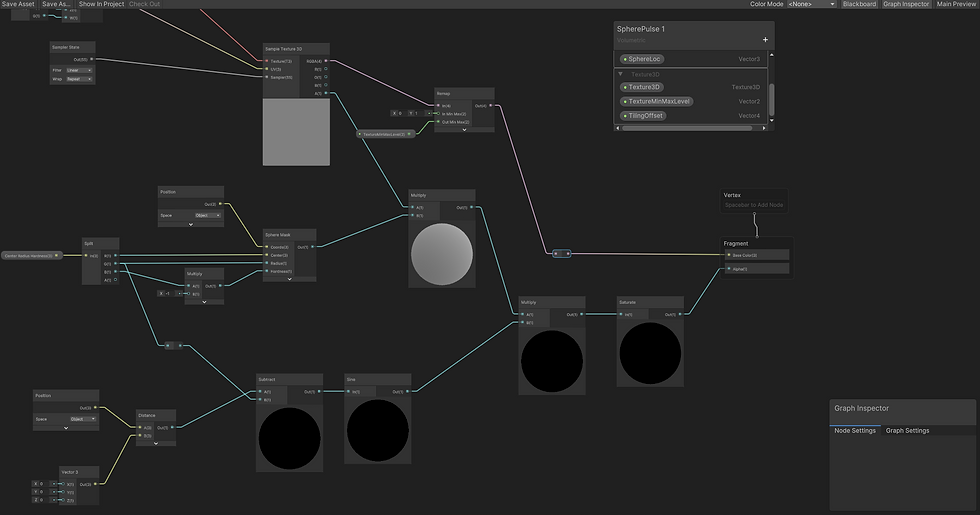
And Here is the result after some tweaking on the Point Light intensity and the contrast of the noise.
As we can see the result is pretty nice and the ripple do go really only in the light shaft because of the Multiply mode of the Local Fog.
The Pulsation are nicely graded by our noise so it's not uniform.
It is a perfect trick for a Light spell!
As I didn't colored the fog, the Points light is responsible for the color of the Effect, but I guess, Local Fogs can have some nice color effect too, like using the hue over distance to get some rainbows or boreal aurora effect.
Let's now just on another very nice feature that was missing a without writting shader, even if there was template, until now, it was hard for non-coder to author PP (*PP = Post process) and Custom Pass FullScreen Effects
Full-Screen Shader Graph
First, let's say what a FullScreen pass is for :
The Idea behind a FullScreen Shader is to apply an effect on the Camera image, using a Custom Pass or a PP to be executed at some point, in the rendering order.
They are plenty of tricks using CustomPass,from the OilPaint effect to the ScreenGlitch, the more relevant is the Outline effect use on all opaque objects like in Borderland :
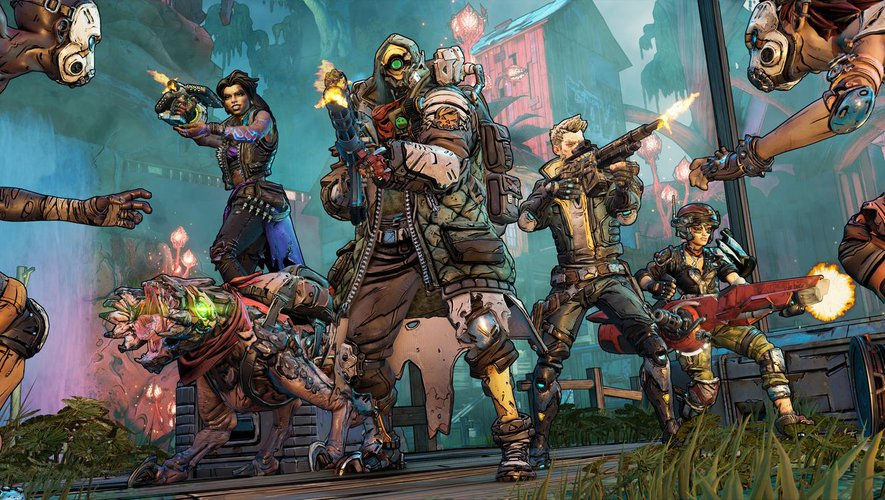
screenshot image from Boderland 3, Gearbox software
Ok, let's try to start to implement a nice Outline of our mint.
First we need to create a test FullScreen Shader in ShaderGraph
There is now some sample materials available in the HDRP package menu in the package manager, let's download the FullScreen ShaderGraph sample.
After a quick look to this samples, we can check the Exemple scene.
Wait there is an Edge detection FullScreen Pass available in the showcase scene!
So i quickly save this CustomPass object and the shader in a prefab which I can use on my own scene.
To be as close as possible of the style of Borderland , there is some few tweak to do :
First, let's remove some node Edge Detection ShaderGraph, there is an effect that don't play nicely with the settings I want :
After that the result using the Pass should be more consitent, he is a video of the result after some tweaking, Temporal AntiAliasing on the camera, and DLSS enabled, render at 80% ratio :
Cinematic Eye Shader
We have now acces to Eye Shader, there is a sample accessible in the HDRP package's Material sample in the Package Manager. I just want to get a sample and add it to our character.
An older/other version of the eye shader is the one from the Digital Human demo teasing the main character of Heretic cinematic. But here we are gonna use the new version from the HDRP Materials samples, this version is more simple to deploy and contain some interresting base materials to start author some eyes.
A screen of the sample Eyes :
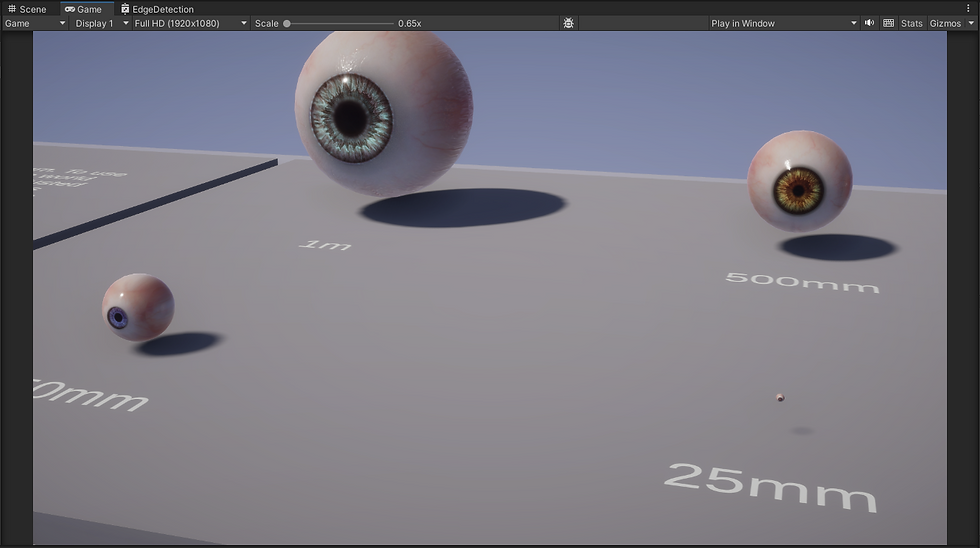
The closer size of what I need for my character is the 250 mm.
let's have a try placing this eyes into my custom character :
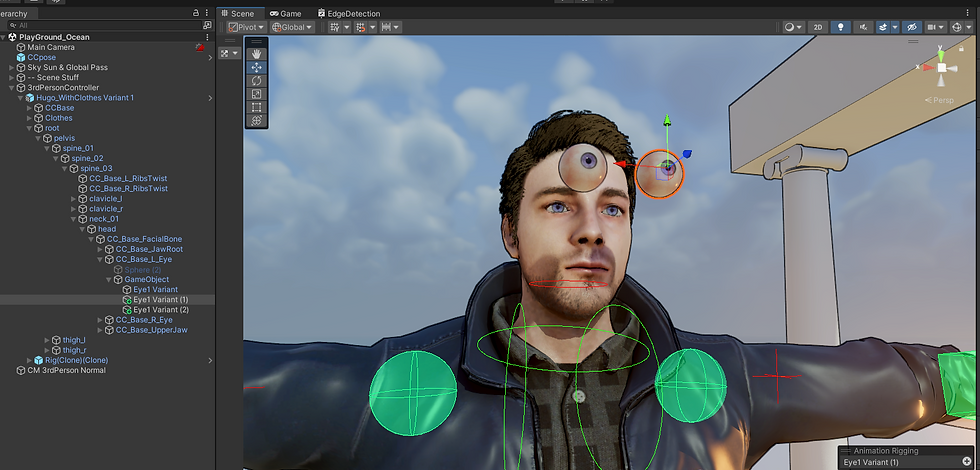
Looking pretty good!
I am pretty happy with the result and i can now see the powerfull potential all this features has.
Custom Render Texture ShaderGraph
custom Render texure chapter will come very soon..
In some planned Posts, we will take a look to :
Cinematic Tooling & Animation Rigging, custom FullBody Controller
Terrain & Vegation
and more!
Commentaires